|
|
|
Who's Online
There currently are 6019 guests online. |
|
Categories
|
|
Information
|
|
Featured Product
|
|
|
 |
|
|
There are currently no product reviews.
 ;
have download a number of manuals todate , most are excellant, one or two sometimes a little difficult to read but a least avaialable, great site .
Brad.
;
Excellent had everything I wanted, very happy with purchase
 ;
This service is relatively cheap, document is fast available, schematic is readable.
Thanks.
;
So far I´m a satisfied customer. I have only downloaded "TECHNICS SX-KN470 Service Manual" maybe I will use it later.
Best regards
Peter
;
Good manual. It is complete and of high quality, both text and graphics. The schematics are with the original big size, so it can be viewed or printed without any loss of resulution and sharpness.
1
2
3
4
A
11 12 13 14
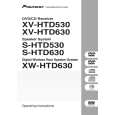
Remove the three screws. Remove the PCB support. Remove the flexible cable and disconnect the connector. Remove the DVDM Assy.
15 16
Connect the two jig cables. Reattatch the three flexible cables(A ) and the one connector (A) from the Table Mechanism Section.
17 12
PCB Support
Remove the soldered joint pickup short point. Reattatch the clamper holder by reattatching the two screws.
18
Flexible cable
Cutting Pliers AF Assy DVD TRADE Assy
13
B
13 11
CN953
14
CN5105
15
CN5107
A
Jig cable (GGD1228)
13
C
11
CN911
11 15
DVDM Assy Jig cable (GGD1222) To DVDM To DVDM CN911 CN953
19 20
D
Insert the insulation sheet between the DVDM Assy and the chassis. Arrange the cables as shown in the photo below.
E
To CN5105
19
Insulation sheet
DVDM Assy
F
120
1 2
XV-HTD530
3 4
|
|
|
> |
|