|
|
|
Who's Online
There currently are 5542 guests online. |
|
Categories
|
|
Information
|
|
Featured Product
|
|
|
 |
|
|
There are currently no product reviews.
 ;
Having purchased a 1994 Kenwood music system from a Charity shop in 2013 (it was a high end product in its day), I found myself not quite knowing where to plug in what, and how to do this, that and the next thing. I needed a Manual, and after failure with another online 'Manual provider' I found Owner Manuals dot com. Well, I wasn't sure, but it was only $5, and if things didn't work out, I wouldn't have lost much...
But things DID work out. After paying my childrens inheritance money, $4.99, I was sent a Manual for my Kenwood System very quickly. Alas, it was in German, and being Scottish, I could not read it or get my system in order from it...a rapid email to them brought the English Manual in short order, and my retro-system was and IS up and running in it's regulation settings.
I am very grateful to http://www.owner-manuals.com for their quick service and for even having such an obsolete Manual in the first place! If you need a Manual for ANYTHING, try here first. I wouldn't be surprised if I bought a 1928 Marconi radio, and got the user Manual for THAT here too!
Top marks.
John Copeland
Glasgow
Scotland
;
I was so happy that the owner's manual was available. It is well written and helped me to use the radio/CD player/recorder without problems. Thanks for making it available.
Irene Lambert
;
Excellant!!! Very quick and easy....Best $4.99 I have spent in a very long time..
I highly recommend this.
;
Thanks so much for the Owner's manual for my Sony PS - FL1. I had purchased the turntable off of eBay. It came in and looked great. Packed well and appeared to be great. I balanced and aligned the tone are and hooked it up. When trying to play a record the tone are would move to the right place and just before it would drop to play it moved back off the edge of the record before touching down. I searched the net for an answer to this issue. No luck. Then I purchased the owners manual and sure enough there was a place to adjust where the stylus touched down. That adjustment solved the problem and saved me a $35 feet to have the player checked out. The manual is well written and easy to understand. It is a must have for anyone with this front loading Sony turntable.
;
Some years back I pruchased a Sansui G-9000. I had it cleaned up and a problem with the left channel repaired. When I got it back I hooked it up to my tape decks, turn tables, TV and it played great. The only thing I was not really satisfied with was the performance of my Graphic Equalizer. I purchased this owner's manual had poured myself a cup of coffee. The manual is well organized and written in plain language. It also contained the solution to my dissatisfaction. By using the preamp connections coupled I was able to run everything through my graphic equalizer and now enjoy the full potential of my complete system.
Précautions d'installation
� Installez les appareils de manière que rien ne fasse obstruction, au-dessus et de chaque côté, et que les ouïes de ventilation ne soient pas obstruées.
6 po. / 15 cm
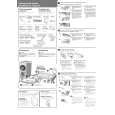
Installation du haut-parleur central et des surrounds sur une paroi
Avant l�installation
� Sachez que les haut-parleurs sont pesants et que leur poids peut entraîner le détachement des vis à bois ou l�arrachement du matériau auxquels ils sont fixés, ce qui provoquerait leur chute. Assurez-vous que la paroi sur laquelle vous voulez fixer les haut-parleurs soit assez résistante pour les supporter. Ne les installez pas sur une surface en contreplaqué ou sur une paroi friable. � Des vis de montage ne sont pas fournies. Utilisez des vis appropriées au matériau de la paroi et pouvant résister au poids des haut-parleurs.
0,2 po. / 5 mm 0,4 po. / 0,2 po. / 10 mm 5 mm
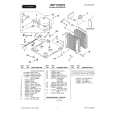
� Ménagez un espace libre d�au moins 2 po. / 5 cm autour du caisson de basses asservi; pareillement, laissez au moins 11 po. / 28 cm au-dessus du récepteur lecteur de DVD/CD et 6 po. / 15 cm à sa droite et à sa gauche, comme le montre l�illustration ci-dessous. Enfin, n�oubliez pas de laissez également 6 po. / 15 cm à l�arrière. � Utilisez périodiquement un aspirateur pour nettoyer l�évent du caisson de basses et en retirer la poussière.
2 po. / 5 cm
2 po. / 5 cm
Vis à bois
6 po. / 15 cm
2 po. / 5 cm
Saillie: 0,2 po. - 0,3 po. (5-7mm)
(S-DV830ST)
Remarque
� Si vous hésitez quant aux propriétés et à la résistance des parois, demandez conseil à un professionnel. Caisson de basses (S-DV940SW/S-DV830SW) � Pioneer n�assume aucune responsabilité en cas d�accident ou de dégâts, découlant d�une installation inadéquate.
11 po. / 28 cm
Syntoniseur et lecteur de DVD/CD (XV-DV940/XV-DV830)
|
|
|
> |
|