|
|
|
Who's Online
There currently are 6043 guests online. |
|
Categories
|
|
Information
|
|
Featured Product
|
|
|
 |
|
|
There are currently no product reviews.
 ;
This is exactly the thing you need to service this box. The manual is complete and the quality of the scan is good. I recommend this!
;
The delivery of this manual was very fast, less than 8 hours. The manual is very clear and concise, and helped a great deal in the repair and final setup of the Hitachi HMA-G2 Amplifier.
;
Great service. The manual was exactly what I was looking for: schematic + layout. I managed to fix the player. Highly recommended!
 ;
At $5,00 certainly good bang for your buck. Includes electric schematics as well as exploded parts view + parts list for reordering. Unfortunately no details on the PCB contents or working, but then again, this is not overly complex. Best bonus: this manual does contain the heavily searched for LED error codes as well as descriptions for test operation. Haven't gotten around to fixing the machine yet, one thing the manual won't do for you is getting it out of the kitchen assembly :-(
;
It`s not your fault tear down is rather incomplete. It doesn`t have complete instructions as to deconstruction for repair.
5
6
7
8
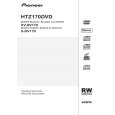
7. DISASSEMBLY
Note 1: Do NOT look directly into the pickup lens. The laser beam may cause eye injury. Note 2: Even if the unit shown in the photos and illustrations in this manual may differ from your product, the procedures described here are common.
A
Disassembly
1 Bonnet, Tray Panel
1 1 2 3 4 5 6 7
Remove the bonnet by removing the nine screws. Press the u STANDBY/ON button to turn on the power. Press the h OPEN/CLOSE button to open the tray. Remove the tray panel. Set the test disc. Press the h OPEN/CLOSE button to close the tray. (Test disc is clamped.) Press the u STANDBY/ON button to turn off the power. Pull out the Power cord. Test disc
B
4
3 2 5
Tray panel Tray
25 16
C
D
How to open the tray when the power cannot be on
1. Slide the rack, loading (White) toward the arrow direction by using a minus screwdriver to release the lock. 2. Manually open the tray. NOTE: Please strongly pushing rack, loading (White) to release the lock because the tray doesn't go out easily.
Minus screwdriver
E
Rack, loading (White) Tray open
F
Bottom view
XV-DV575
5 6 7 8
33
|
|
|
> |
|