|
|
|
Who's Online
There currently are 6043 guests online. |
|
Categories
|
|
Information
|
|
Featured Product
|
|
|
 |
|
|
There are currently no product reviews.
 ;
Fast Download,all pages present,an excellent copy.THis enabled to find the origional part numbers and chase them up. The cartridge is proving difficult to find but at least I know the origional part number.Thanks to all.
;
The manual was as described. Complete with parts list and technical information. Fast delivery.
 ;
Simple and fast...
The diagrams are clear and legible; i have been a great help.
The site is very reliable and precise thanks.
;
Very easy site. Great service and quick release for download. Manuals are of good quality.
Joop - The Netherlands
;
Very good manual, in depth and complete. Only criticism is that some of the circuit diagrams are slightly blurry and hard to follow for long periods of time, but this is to be expected. Perfect for any maintenance required. Also contains the wiring diagrams of the control cable for constructing extensions.
1
2
3
4
A
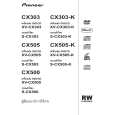
Removing the Traverse Mechanism Assy-S and 06SD Pickup Assy-S
1 06 LOADER Assy
1
Short-circuit point by soldering.
Note: After replacement, connect the flexible cable, then remove the soldered joint (open).
3
4
3
B
2 3 4
Disconnect the four connectors. Remove the two screws. Remove the 06 LOADER Assy.
06 LOADER Assy Rear view 06SD Pickup Assy-S
C
2 2
22
Note: Do not touch the bottom side of the 06SD Pickup Assy-S. If touched, the optical axis may be shifted.
1
DVD MAIN Assy
2 Bridge 04, Tray
D
1 2 3
Remove the one screw. Remove the bridge 04. Pull out the tray, then remove it by pressing the hook.
1 3
-2
2
Hook
E
Tray Bridge 04
3
Note when reinserting the tray
When reinserting the tray, first align the triangle printed on the loading base and the pin of the drive cam, then insert the tray.
-1
Drive cam
Pin
F
Front side Loading base Triangle
4
38
1 2
XV-CX505
3
|
|
|
> |
|