|
|
|
Who's Online
There currently are 6043 guests online. |
|
Categories
|
|
Information
|
|
Featured Product
|
|
|
 |
|
|
There are currently no product reviews.
 ;
Very well done!!!!! congratulations. It was a bit longer than usual the wiating time even if it was on time (in 24 hours).
;
Last week I bought a second hand BAUKNECHT TRK4850 DRYER. It is a professional machine with many programs and switch options. I feared it would be a huge quest to find a manual. I was delighted when I found owner-manuals.com. After payment I received the file to download the next day already. The quality is great. I am very happy. Thanks!
but kindly the distributions of the operating programs not find in the owners manual,can you help me to understand the operating programs instructions thank you
;
Very good copy, very readable and easy transaction as always.
;
It is perfect, exactly what we needed. It's like the paper version but less clutter.
 ;
Received my manual within 24 hours. Very clear scan of the manual I needed. Thanks!
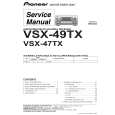
Remote Control of Other Components
VIDEO SEL
SIGNAL SEL
TAPE 2
EFFECT/CH SELL
5
TONE
6
BASS/TREBLE
7 � +10
8 +
DISC
6 Point the remote control at the component you want set and press ENTER.
OK? will appear in the remote control display. If the component you are trying to control turns on/off you have set it correctly. Use the 5� buttons to select YES and go on to step 7. If the component you are trying to control does not turn on/off the correct preset code has not been selected. In this case, use the 5� buttons to select NO, press ENTER and go back to step 5. Try another preset code for that maker. (If the component you are trying to setup doesn't have a standby/on mode it won't turn on even if the correct preset code is entered. In this case select YES and go on to step 7.) If you can't seem to get the component you are trying to set to turn on or off you can still set up your remote control by using the LEARNING mode (on the next page).
9
SYSTEM SETUP
MENU
0
ENTER
DIRECT ACCESS DISP MODE REMOTE SETUP
TUNER EDIT
6-9
STATUS
GUIDE
ENTER
EXIT
RETURN
MPX
DTV ON/OFF
¶ � 1 STATION � 4
TUNING CHANNEL�
8
BAND
EXTRA MENU
3
DTV MENU CLASS
7
+ ¡ STATION + ¢
CHANNEL+
TUNING
7 Press ENTER. The preset code has been entered.
COMPLETE will appear in the display. Naturally it's easiest and most logical to assign the button that has the same name as the component you are setting up (for example, choose the DVD/LD button for your DVD player). You may find you have components which do not correspond to the name on any MULTI CONTROL button (for example a cable TV tuner) or you have two components where only one button is provided (for example, CD-R/TAPE 1). In this case, use step 3 to assign any available MULTI CONTROL button to the component you want to remote control. For example, you may have both a CD-R and a tape deck in your system but only one video deck. It would make sense to assign the CD-R/TAPE 1 MULTI CONTROL button to the CD-R and the VCR 2 MULTI CONTROL button to your tape deck. To do this choose VCR 2 in step 3 when you want to set up the tape deck. Then choose TAPE in step 4 and proceed as above. The only practical difference in this method is that you have to remember the VCR 2 MULTI CONTROL button is actually your tape deck. In this case, you would need to hook up your tape deck to the input jacks marked VCR 2 on the back of the receiver. This method should help you customize the remote control for your system and let you control all of your components with the remote control for the VSX-47TX.
OPERATION
8 Repeat the process from step 2 for all of your components. 9 Select EXIT and press ENTER.
63
|
|
|
> |
|