|
|
|
Who's Online
There currently are 6043 guests online. |
|
Categories
|
|
Information
|
|
Featured Product
|
|
|
 |
|
|
There are currently no product reviews.
 ;
VERY GOOD SERVICE.FAST ANS VERY HONEST PRICE .RHAANK HERNAN
 ;
Thanks to this service manual I repaired my old camcorder! The manual perfectly explains how to disassemble the camcorder step by step.
;
This manual is very useful because it presents the technical specifications of the cd player, including the manufacturer of the reader, this helps if you need to replace it. It also displays the settings and layout of the circuit.
;
Manual was a good representation of service infomation for the EWV404. It worked well for my repair.
;
Great quality copy, right what I was looking for, all I need to fix my radio.
Thanks
1
2
3
4
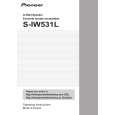
1. REASSEMBLY AND DISASSEMBLY PRECAUTIONS
A
� The grille is inserted into the baf�e. To detach it, insert the grill removal tool into each of the 4 corner holes of the grille net and pull it out carefully. � The baffle frame is attached to the wall/ceiling by 6 external screws. To detach it, unfasten those screws. � The crossover networks is attached to the baf�e by 4 external screws. To detach them, first disconnect the speaker's wires. Next remove the baf�e. Then unfasten those screws. � The tweeter is attached to the baf�e by 2 external screws. To detach it, unfasten those screws. When re-attaching it, face its terminal rightward. � The woofers are attached to the baf�e by 4 external screws. To detach them, unfasten those screws. When re-attaching them, face its terminal lower right. � Attach the speaker frame to the wall/ceiling, and tighten the screws lightly (temporary attachment). At this point the rotating clamp will rotate so that the rotating clamp and frame are clamped on to the wall/ceiling. Gently try pulling the speaker forward and check that all of the rotating clamps have rotated outwards and are lightly clamping to the wall/ceiling.
B
C
Rotating clamp Speaker frame
D
Screw
� Tighten the screws firmly using no more than the maximum torque speci�ed. Allowable maximum torque: 1.0 N.m � Screwing them in too tightly could break the rotating clamps, twist the frames, damage the walls/ceilings and make it dif�cult to attach the grille.
E
F
2
1 2
S-IW531L
3 4
|
|
|
> |
|