|
|
|
Who's Online
There currently are 5653 guests online. |
|
Categories
|
|
Information
|
|
Featured Product
|
|
|
 |
|
|
There are currently no product reviews.
 ;
Very usefully, I could find the trouble clearly with that manual.
;
Bon produit. Permet de corriger les couleurs et de redonnez un petit coup de jeune à vos vieilles vidéos. On regrettera juste le manque d'une prise s-vidéo.
 ;
Quality scan of the actual service manual, just what I was looking for.
;
Straightforward ordering process. Service manual scan was clear & easy to read. Very comprehensive instructions for alignment. Excellent, thank you.
;
Fast, clear and useful. Important for me: the manual is in German.
1
2
3
4
A
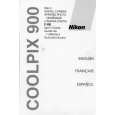
CS Assy ( Surround and Center ) The grille assy is attached to the cabinet by 4 external screws. To detach it, unfasten those screws. When attaching it, it attaches, as the connection cord is under the speaker unit. ( Surround ) The grille assy is attached to the cabinet by 8 external screws. To detach it, unfasten those screws. When attaching it, it attaches, as the connection cord is under the speaker unit. ( Center ) The speaker unit is attached to the grille by 4 internal screws. To detach it, first remove the grille assy. Next unfasten those screws, and remove the cable. When attaching it, face its terminal leftward. (See to the backside of the grille assy.)
CS Assy ( Subwoofer ) The cosmetic baffle is attached to the cabinet by its bosses. To detach it, pry it open by inserting a flat blade screw driver into lower slot. To attach it, clean the press-fitting part and apply a bit of adhesive . Then press it to the bafle. (Fig. 2) The passive radiator is attached to the baffle by 4 external screws. To detach it, first remove the cosmetic baffle. Then remove the passive radiator. When attaching it, face its the rib for input terminal board toward the vertical direction. The woofer is attached to the back board of cabinet by 4 external screws. To detach it, unfasten those screws. When attaching it, face its terminal upward. The input terminal is attached to the back board by press-fitting and glue. To detach it, pry it open by inserting a flat blade screwdriver into the lower side. When attaching it, the red terminal is right-side.
B
apply adhesive
apply adhesive
C
Fig. 2
D
E
F
2
1 2
S-EV1000V
3 4
|
|
|
> |
|