Super Anleitung. Ordentliche Auflösung. Das ganze noch in Deutsch wäre zu schön. Alle Datenblätter sind sauber Kopiert und alle Leitungswege sind sauber ausgeführt
Text excerpt from page 30 (click to view)
1
2
3
4
7. GENERAL INFORMATION
7.1 DIAGNOSIS
A
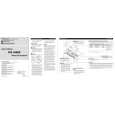
7.1.1 DISASSEMBLY
- Removing the Case (Fig.1)
1 2
Remove the two screws.
2
Remove the five screws and then remove the Case.
2
2
B
2
2
1
1
Case
C
Fig.1
- Removing the Amp Unit (Fig.2)
1 2
Remove the six screws.
1 2 2
1
1
1 1 2 2
Remove the nine screws.
Disconnect the connector and then remove the Amp Unit.