|
|
|
Who's Online
There currently are 5983 guests and
2 members online. |
|
Categories
|
|
Information
|
|
Featured Product
|
|
|
 |
|
|
There are currently no product reviews.
 ;
Quality scan of the original. All the detail necessary to troubleshoot, repair and adjust the unit. I'm sure I will be downloading more manuals in the future as the need arises.
;
Exactly as described, a Service Manual complete with the schematics and PCB layout delivered in a timely manner. Many thanks for the great service.
 ;
some of the writing is a bit blur but the part in the schmatic was great and i have fixed the machine thanks
;
Well.. I'd searched for this manual and although I found many copies online I was pleased to find your website with a well balanced pricing system and easy to search and follow links. That together with the very quick response time was just what I was looking for.. being a very impatient tech.. ;-) I had the service manual in front of me within a short time.
Bookmarked.. and you can bet I will always come here first for my service & user manuals..
best regards
Ed(Tony) Foley
G7WHK
;
I will definitely be back for more information when I need it.
PDP-501MX, PDP-V501X
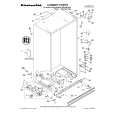
2.Removing the Front Protection Panel (Fig. 3, Fig. 4)
1) Remove all screws 2 and 4 inside the front case. Be careful not to remove screws B (two at the bottom) and screws C (three at the top) because they are used for securing the aluminum sash. 2) Remove all panel shields 1 and 3 and panel holders 2 and 4. 3) Remove and replace the front protection panel. 4) Attach the protection panel by attaching to the bottom left side first, and then attach the front case assembly in the reverse procedure of the above. When securing the front case to the unit, attach the two bosses D (one each on the two edges of the top) as a guide so that the boss at the center A passes through the hole on the rear case. Note) When attaching the panel shield and panel holder after replacing the protection panel, the panel shield may deform when tightening the screws 3 as shown in Fig. 4. If it deforms, untighten screws 3 slightly and tighten until just before it starts to bend.
3 3 2
Panel cushion 50V Panel cushion 50V Panel cushion 50H
4
Front protection panel 2 Shield gusket F Shield gusket D
2 2 1 2 1 2 2
3 3
3 C D
C
Panel cushion 50H
1 A
2 1
2 2
Shield gusket F Shield gusket C Shield gusket E
Shield gusket D
2 2 1 1
2 2 2 2 2 2 2 1 1 2 B
Shield gusket G
C D 3
Shield gusket B
3
B
4
Shield gusket H
3 3 3
Front case
3 3
Aluminum sash D Aluminum sash U
Fig. 3
77
|
|
|
> |
|