|
|
|
Who's Online
There currently are 6043 guests online. |
|
Categories
|
|
Information
|
|
Featured Product
|
|
|
 |
|
|
There are currently no product reviews.
 ;
It is perfect, exactly what we needed. It's like the paper version but less clutter.
 ;
Received my manual within 24 hours. Very clear scan of the manual I needed. Thanks!
;
Very clear scan, I recommend it. Definitely a must have for any 3362 owner.
Alpine could have written a slightly more complete manual, though. It's already pretty huge, but the unit has so many functions, I feel some more explanation would have been better.
Yamaha's manual of their comparable YDSP-1 is a little better in my opinion.
;
Immediate response with excellent service - highly reccommended
;
Correct manual received and of good quality but the contents of the file for the Service Manual for the same monitor is for a 20" TV not the RGB Monitor.
Section
04
Installation
Before installing the amplifier
WARNING
! To ensure proper installation, use the supplied parts in the manner specified. If any parts other than those supplied are used, they may damage internal parts of the amplifier, or become loose causing the amplifier to shut down. ! Do not install in: � Places where it could injure the driver or passengers if the vehicle stops suddenly. � Places where it may interfere with the driver, such as on the floor in front of the driver�s seat. ! Install tapping screws in such a way that the screw tip does not touch any wire. This is important to prevent wires from being cut by vibration of the car, which can result in fire. ! Make sure that wires are not caught in the sliding mechanism of the seats, resulting in a short-circuit. ! When drilling to install the amplifier, always confirm no parts are behind the panel and protect all cables and important equipment (e.g. fuel/brake lines, wiring) from damage.
! After installing the amplifier, confirm that the spare tire, jack and tools can be easily removed.
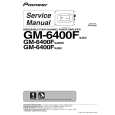
Example of installation on the floor mat or chassis
1 Place the amplifier in the desired installation location. Insert the supplied tapping screws (4 mm � 18 mm) into the screw holes and push on the screws with a screwdriver so they make an imprint where the installation holes are to be located. 2 Drill 2.5 mm diameter holes at the imprints either on the carpet or directly on the chassis. 3 Install the amplifier with the use of supplied tapping screws (4 mm � 18 mm).
CAUTION
! To ensure proper heat dissipation of the amplifier, ensure the following during installation: � Allow adequate space above the amplifier for proper ventilation. � Do not cover the amplifier with a floor mat or carpet. ! Avoid routing wires through hot areas, such as near the heater outlet. Heat may damage the insulation, resulting in a short-circuit through the vehicle body. ! The optimal installation location differs depending on the car model. Secure the amplifier at a sufficiently rigid location. ! Firstly make temporary connections and check to ensure the amplifier and system operate properly.
1 Tapping-screws (4 mm � 18 mm) 2 Drill a 2.5 mm diameter hole 3 Floor mat or chassis
12
En
|
|
|
> |
|