|
|
|
Who's Online
There currently are 5885 guests online. |
|
Categories
|
|
Information
|
|
Featured Product
|
|
|
 |
|
|
There are currently no product reviews.
 ;
Good copy and great customer service! There was some confusion with my order and it was resolved promptly!
;
Having bought a pre-owned Sony FM stereo tuner through eBay, it came without any manuals. It soon became clear that to get the best from this excellent tuner I needed a decent manual because much of the operation was not intuitive to a newboy to hi fi like me. I managed to download the official Sony multi-lingual manual from Owner-Manuals.com with no problem at all - a really quick and easy service. I'm very glad I did because I found out all the operations of the tuner and was then able to not only set it up quickly but also to get much more from it that poke-and-hope trialling would ever achieve. In my book $4.99 very well spent.
;
This manual is immaculate in it's accuracy. Everything is written very clearly and easy to understand. Written by a professional who wants to convey a clear and easy to understand message!!
;
This Manual (as downloaded) is both informative and comprehensive and has proved to be extremely useful. thoroughly recommended.
;
everything is ok, thank you very much! Product is good, no problems with download!
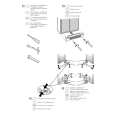
Basic Operations (Loading and Removing Discs)
Loading and Removing Discs
Forced eject function
Insert with label surface upwards
If a disc fails to be ejected when the EJECT (0) button is pressed or otherwise when you cannot remove a disc, insert the provided pin into the forced eject hole at the front of the player (see illustration) and press to eject the disc. When using the forced eject function, be sure to following the accompanying precautions. 1 Turn off the player�s power and wait for at least one minute. Attempting the forced eject function immediately after turning off the power may cause the following dangers: ¶ The disc may be ejected while still rotating, resulting in personal injury. ¶ The disc may be damaged due to the disc clamp�s rotating in an unstable condition. 2 Use only the provided accessory pin for this procedure (do not use other pointed objects). The forced eject pin is located on the bottom surface of the player. When the accessory pin is inserted fully into the forced eject hole, the disc will be ejected from the loading slot by about 5-10 mm. It can then be grasped with the fingers and removed.
Hold evenly when inserting
1. Set the rear panel POWER switch to ON.
Do not attempt to force a disc into the slot when the POWER switch is turned OFF, since the disc or loading mechanism may be damaged.
2. Insert the disc into the loading slot.
¶ Hold the disc with label surface upwards and insert evenly into the front-panel disc loading slot. ¶ When using 8 cm compact discs, place the disc into an adapter first. ¶ Only one disc can be loaded at a time. Do not attempt to load two or more discs simultaneously, or to load a second disc when another disc is already loaded. ¶ When loading a disc, do not apply bending force on the disc, or attempt to force the disc into the mechanism. Also, when the loading mechanism begins to pull the disc into the player or to eject a disc, do not attempt to forcibly override the mechanism�s movement, since the disc or loading mechanism may be damaged.
3. When the eject/stop mode select switch is set to UNLOCK, press the EJECT (0) button to eject a loaded disc. If the eject/stop mode select switch is set to LOCK, during playback press the PLAY/PAUSE (6) button to first stop the disc, then press the EJECT (0) button. If a cue point has been set, during playback press the CUE button to initiate back cue, then press the EJECT (0) button to eject the disc.
¶ When the button is pressed, disc rotation will stop and the disc will be ejected partway from the loading slot.
Forced eject hole
Note:
Do not attempt to press the disc back into the slot while the �EJECT� indicator is lighted. If the disc is pressed back in while the �EJECT� indicator is lighted, the loading mechanism may stop. In this case, press the EJECT (0) button again, and do not attempt to reload the disc until the �EJECT� indicator has turned OFF.
Note:
This player does not support playback of 8 cm DVDs. Do not attempt to use adapters meant for 8 cm CDs, since the adapter may come loose during rotation, causing damage to the disc or component.
Precautions when playing 8 cm CD singles
1 When playing 8 cm CD singles, be sure to use an adapter designed for 8 cm CDs. Before loading the disc into the player, confirm that the disc is fastened correctly by the adapter�s tabs. If an 8 cm disc is loaded by mistake without an adapter, immediately press the EJECT (0) button and remove the disc. If the disc is not ejected the first time the EJECT (0) button is pressed, press the button again. 2 Use only 8 cm disc adapters that feature the ' logo mark (recommended compatible adapters). When mounting the disc to an adapter, confirm that the disc is able to rotate freely, and is not bent or warped.
30
En <DRB1360>
|
|
|
> |
|