|
|
|
Who's Online
There currently are 6043 guests online. |
|
Categories
|
|
Information
|
|
Featured Product
|
|
|
 |
|
|
There are currently no product reviews.
 ;
It was just what I needed. Thanks for your quick action and great price. You guys are top notch.
Thanks
 ;
Excellent manual, complete, great resolution, easy to read especially the schematics. Thank you !
;
Fast delivery, excellent resolution and complete. And above all, the best price ever !
;
Vielen Dank,
das war eine prima Sache. Habe das Serviceheft nach 3 Stunden herunterladen können. Qualität OK. Hat mir mit Erfolg bei der Fehlersuche und Reparatur meines
Nordmende Galaxy Mesa 9000 geholfen. Ich kann diesen Service bestens weiterempfehlen
A very good service.
Thank You!
;
everything i needed. it was easy to get. and this site is now my go to site for manuals.
DV-533, DV-3310, DV-533K, DV-5310KD
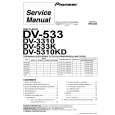
Disassembly of the Traverse Mechanism Assy and the Pickup Assy 1 2 3 4 5 6
Remove the Bonnet and Tray Panel. Remove the Front Panel. Remove the Bridge (Screw �1). Pull out the Tray and remove it while unhooking a Hook. Turn the Short SW to Short side. Remove three connectors.
7 8
Remove the Loading Mechanism Assy (Screws �4). Remove a screw.
Cautions:
Screw is locked with Silicone Adhesive. Please lock it with Silicone Adhesive when installs it. Remove the FFC Holder with the state which Flexible Cable was atatched. 8 Silicone Adhesive GEM1037 Traverse Mechanism Assy
9
4
-1
Hook Bridge
9 3
-2 -1
3
6 6
6
FFC Holder
4
-2 DVDM Assy Bottom View
RearView
Pickup Assy
Short
Open
5
Short SW
When Removing The Traverse Mechanism Assy
Caution in the tray insertion
In the Tray insertion, insert it after matching a triangle mark of the Loading Base and a position of pin of the Drive Cam. Triangle mark Loading Base
10 11 12
Remove the Pickup Flexible Cable Unhook ( �4) Remove the Traverse Mechanism Assy
Traverse Mechanism Assy
DVDM Assy Side
11 � 2
12
10
11 � 2
Traverse Mechanism Assy
Pin
Drive Cam
Exchange
73
|
|
|
> |
|