Superb rendition. Drawings (schematics) complete and unabridged. I do a great deal of vintage audio restoration. Documentation is essential for successful repairs. I have found sources over the years that offer good documentation, but rarely all that is necessary. Owner's Manuals has filled that void with complete and legible documentation. They have narrowed my "favorites" to a more manageable collection. This Denon manual in particular contained the latest revisions level, and offered alterations favorable to updating the item. The Illustrated Parts Breakdown (IPB) was well enough detailed to simplify part symbols and physical locations. You will not be disappointed!
very fast detailed and accurate hope to do business again
Text excerpt from page 71 (click to view)
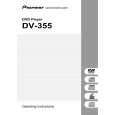
7.1.6 DISASSEMBLY DIAGNOSIS OF FJMB ASSY
1 Bonnet and Tray Panel
1 2 3 4 5 6
Remove the Bonnet (Screws � 6) Power ON Tray open (0) Remove the Tray Panel Tray close (0) Pull out the Power Cable from the outlet.
DOUT ASSY : This is not installed to this.
How to Open the Tray by Manual Operating
In the reverse state, pass a small screwdriver through a slit and slide a protruding portion of the Drive Gear of the Loading Mechanism Assy to the direction of arrow. If the Tray moved toward the front about 2 or 3 cm, pull out the Tray by hands. Small Square-bar Screwdriver
Slit
2
Protruding portion
Small Square-bar Screwdriver
4 5 3
Tray Tray Panel Loading Mechanism Assy
35
Drive Gear
2 Front Panel Assy
1 2 3 4
Unclamp the wire. Disconnect the wiring. Unhook (�6) Remove the Front Panel.