|
|
|
Who's Online
There currently are 6001 guests online. |
|
Categories
|
|
Information
|
|
Featured Product
|
|
|
 |
|
|
There are currently no product reviews.
 ;
Thank´s for your help, I already recived these manual from you
;
Thank you for your manual It has the basic things to and i use the Oszi for Longer Time.
THX
;
Actually, I was looking for this information for 3 years!...now thanks to you, the manual is on my hands and of great help, cause I understand now where I was doing wrong connections and wires...excellent, I'll be back to you if in need, thank you.
 ;
This manual covers the main equipment features only. While it also includes the procedure for saving and loading from the now long obsolete memory cards it does not mention the how to operate with the optional floppy drive interface so I am still at a loss about how to use this! Note that there is a separate manual covering the MIDI interface and programming via the keyboard, not included in this download. You will also need to get hold of this if you want to use the MIDI interface properly. Basically there is little difference between this manual and the free to download manual for the similar PR60 model.
;
Good list of manuals. I found a very rare one and easily get. Should be promptly to download, as we must to wait hours even after confirmed payment.
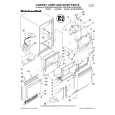
INSTALLATION-RELATED PRECAUTION
Before installing the unit, read and follow the following instructions. ¶ This unit can be installed on only one changer. ¶ This unit occupies two of the rear bays. The rear bays where this unit can be installed are the odd-numbered rear bays. ¶ It is impossible to install another unit in 1 or more of this unit�s rear bays (odd numbered). Attempting to install another unit will cause a malfunction, so do not attempt to do so.
INSTALLATION
For instructions on how to open the access doors, see the operating instructions for the changer. 1. When inserting a unit, be sure to place the unit on the changer guide rails and push the unit in until the lock lever on the unit shifts to the locked position. Maybe you can hear a clicking sound then. 2. Connect the changer interface cable.
Changer interface cable
Guide rails
Disc flip unit
NOTE: Connect the changer interface cable to the connector corresponding to the bay in which the units have been installed. (Note that labels are affixed to connectors indicating the corresponding bay number.) Note that it is extremely important to do this, as connecting the changer interface cable to a neighboring bay will result in damage to discs and the disc transport mechanism.
Warning about static electricity
Lock lever
When a unit is to be removed from the changer, flip the lock lever to the released position and then pull the unit out from the changer.
Always be sure never to touch the contacts or ports when operating units. Also be sure to touch a metallic surface on the changer before installing additional units to the changer.
5
<DRC1287> En
English
|
|
|
> |
|