|
|
|
Who's Online
There currently are 5930 guests and
2 members online. |
|
Categories
|
|
Information
|
|
Featured Product
|
|
|
 |
|
|
There are currently no product reviews.
 ;
Thank´s for your help, I already recived these manual from you
;
Thank you for your manual It has the basic things to and i use the Oszi for Longer Time.
THX
;
Actually, I was looking for this information for 3 years!...now thanks to you, the manual is on my hands and of great help, cause I understand now where I was doing wrong connections and wires...excellent, I'll be back to you if in need, thank you.
 ;
This manual covers the main equipment features only. While it also includes the procedure for saving and loading from the now long obsolete memory cards it does not mention the how to operate with the optional floppy drive interface so I am still at a loss about how to use this! Note that there is a separate manual covering the MIDI interface and programming via the keyboard, not included in this download. You will also need to get hold of this if you want to use the MIDI interface properly. Basically there is little difference between this manual and the free to download manual for the similar PR60 model.
;
Good list of manuals. I found a very rare one and easily get. Should be promptly to download, as we must to wait hours even after confirmed payment.
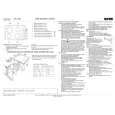
PART NAMES AND FUNCTIONS 43 CH-1 effect switch and indicator (EFFECT LOCK ON/OFF/ON)
To turn effects [ON], either pull switch forward (switch returns automatically to [OFF] when released) or slide to far side to the [LOCK ON] position. When effects are [ON], the indicator flashes and effects are applied to CH-1.
49 CH-2 effect mix ratio/depth adjust dial (MIX/DEPTH)
Use to adjust the volume (amount) of effects applied to CH-2 (rotate clockwise to increase effects, counterclockwise to reduce).
44 CH-1 TAP button
Under normal conditions, the automatic BPM counter operates to display the track�s BPM value on the touch panel. Automatic BPM counting may be difficult with some tracks, however. In such cases, or if you wish to deliberately set a different BPM, use the TAP button. � The BPM value can be changed by rotating the TIME/ SELECT dial while holding the TAP button depressed. � Tapping the button in time with the beat will cause the function to switch to the manual BPM count mode; the tapped beat will be counted and displayed as the BPM value. Returning to the auto BPM mode is performed from the effect parameter adjust screen (see page 16, �Automatic Mode BPM Counting�) .
50 CH-2 effect switch and indicator (EFFECT LOCK ON/OFF/ON)
To turn effects [ON], either pull switch forward (switch returns automatically to [OFF] when released) or slide to far side to the [LOCK ON] position. When effects are [ON], the indicator flashes and effects are applied to CH-2.
51 CH-2 TAP button
Under normal conditions, the automatic BPM counter operates to display the track�s BPM value on the touch panel. Automatic BPM counting may be difficult with some tracks, however. In such cases, or if you wish to deliberately set a different BPM, use the TAP button. � The BPM value can be changed by rotating the TIME/SELECT dial while holding the TAP button depressed. � Tapping the button in time with the beat will cause the function to switch to the manual BPM count mode; the tapped beat will be counted and displayed as the BPM value. Returning to the auto BPM mode is performed from the effect parameter adjust screen (see page 16, �Automatic Mode BPM Counting�) .
45 CH-2 effect bank buttons and indicators (BANK 1, 2, 3)
When one of these buttons is pressed, the indicator lights and the corresponding preset effect is enabled. Each BANK button can be recorded with three effects for CH-2 (at time of shipping, the buttons have been factory preset with typically used effects). BANK 1 is selected in the default condition after power is initially turned on.
46 CH-2 effect parameter adjust button (FX ADJ.)
Press to display the touch panel�s CH-2 effect parameter adjust menu.
47 Fader curve display and CH-2 effect select button (FADER CURVE/BANK EDIT)
Press to display the fader curve on the touch panel. Holding the button depressed for about one second will cause the touch panel to display the CH-2 effect select menu.
48 CH-2 effect time adjust/select dial (TIME/SELECT)
Use to adjust the time parameters of effects applied to CH-2 (rotate clockwise to lengthen, counterclockwise to shorten). When the effect select menu is displayed, causes the effects list to scroll.
11
<DRB1349>
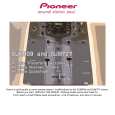 $4.99 DJM-909 PIONEER
Quick Start Quick start guide ( sometimes called quick guide ) contains most important information on how to use…
|
|
|
> |
|