We received the manual in a timely manner and it was exactly what we were expecting. Excellent replacement for original Service Manual.
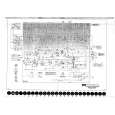
All schematics are very legible. We are really satisfied.
We received the manual in a timely manner and it was exactly what we were expecting. Excellent replacement for original Service Manual.
All schematics are very legible. We are really satisfied.
We received the manual in a timely manner and it was exactly what we were expecting. Excellent replacement for original Service Manual.
All schematics are very legible. We are really satisfied.
We received the manual in a timely manner and it was exactly what we were expecting. Excellent replacement for original Service Manual.
All schematics are very legible. We are really satisfied.
We received the manual in a timely manner and it was exactly what we were expecting. Excellent replacement for original Service Manual.
All schematics are very legible. We are really satisfied.
Text excerpt from page 66 (click to view)
1
2
3
4
- Removing the Gear Unit
A
Move the Arm Unit to the CLOSE POSITION. (Fig.3)
1
Remove the four screws and then remove the Gear Unit. (Fig.6)
*) When you remove or intall the Gear Unit, do so with the Arm Unit in the CLOSE POSITION.
1
B
1
1
1
Gear Unit
Fig.6 - Checkpoints for the Gear Unit
C
1. When you disassemble or assemble the Gear Unit, do so with the Arm Unit in the CLOSE POSITION. Make sure that the Arm Unit is in the CLOSE POSITION by seeing the other side of the unit through the fully circular hole shown in the figure. 2. When you install the motor, fix the screws holding the motor in the direction of the arrow shown in the figure.