|
|
|
Who's Online
There currently are 6043 guests online. |
|
Categories
|
|
Information
|
|
Featured Product
|
|
|
 |
|
|
There are currently no product reviews.
 ;
Manuale perfetto. Ottimo e utilissimo. Grazie a questo manuale ho potuto realmente risolvere il complesso problema della stampante.
;
Manuale perfetto. Ottimo e utilissimo. Grazie a questo manuale ho potuto realmente risolvere il complesso problema della stampante.
 ;
Was very fast and accurate service. Just what I needed. I recommend to everyone.
;
Very good scan quality, only PC Board scan not enough contrast.
;
First of all I must say that I received the manual in just a few minutes after placing the order. The copy is well done and very readable. I will buy others soon... Thanks, Meyer
1
2
3
4
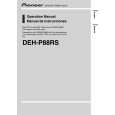
- How to remove the Load Carriage Motor Assy
1. Make the system in the carriage mechanism mode, and have it clamped. 2. Release the leads (orange and purple) of Load Carriage Motor Assy from the CD Core Unit and remove the holder. 3. Remove the Poly Washer, Change Arm, and Pickup Lock Arm. 4. Remove the two Screws (A) and the Bevel Gear Bracket (Note that the gears will come off). 5. Remove the two Screws (B) and the Gear Bracket (remove the CD Core Unit, if necessary), and remove all the gears. 6. Remove the two Screws (C) and the Load Carriage Motor Assy. Caution: When assembling the Load Carriage Motor Assy, move it to the direction shown in the illustration (1). When treating the leads of the Load Carriage Motor Assy, do not make them loose over the Feed Screw.
Gear Bracket Screw B Screw A Bevel Gear Bracket Poly Washer Change Arm Pickup Lock Arm
A
B
Load Carriage Motor Assy
Screw C
C
1
D
E
F
26
CX-3164
1 2 3 4
|
|
|
> |
|