|
|
|
Who's Online
There currently are 5825 guests online. |
|
Categories
|
|
Information
|
|
Featured Product
|
|
|
 |
|
|
There are currently no product reviews.
 ;
Hi - happy with what I received but not quite what I wanted - my fault I assumed that service manual would also include operational instructions which is what I needed - all I needed to know was how to turn the radio - thanks
;
this Manual very important when i buy this Manual i already fix the trouble of my Camera..... thanks keep up the good work.!
 ;
This service manual helped me to repair my PIONEER. Iam very satisfied, that I found it here.
Even the price of manual was not so high that person would not be able to spend a few money.
But that is very worth spent money. Thanks
;
Excellent quality service manual. Quick processing, fair prices. Love to do business again. Thank you!!!
;
Excellent service manual, the only known point of note is the alignment of improvability scanned pages within the pdf page. The resolution is good.
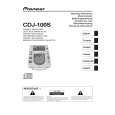
CDJ-100S
9 Disengage the hooks on the left and right side (2 each), and
remove the loading base assy. 0 Remove the servo mechanism assy.
DISPLAY BOARD Assy 1 Remove the jog dial and the slide knob at the top of the body, and
then remove the nut (M9) and jog washer.
Jog Dial
1
LOADING BASE ASSY Nut (M9) Jog Washer
1
Slide Knob
10
SERVO MECHA ASSY
Hook
9
Hook
9 9 9 2
2 Disconnect the earth lead unit. 3 Remove the 13 screws F.
DISPLAY BOARD ASSY Earth Lead Unit
Removal of the Each P. C. Boards
TRANS BOARD Assy 1 With the slot-in Mechanism Assy removed, disconnect the
connector (CN705). 2 Remove the screw C and disconnect the cable stay. 3 Remove the seven screws D, raise front side of the TRANS BOARD assy, and remove it.
Cable Stay TRANS BOARD ASSY Screw D Screw D
3
Screw F (� 13)
2
Screw C
Caution for the time of assembly
Screw D
Turn the jog dial and check for abnormalities like uneven turning etc. Nut Tightening Torque: 8 kg · cm or less
3 1
CN705 MOTHER BOARD ASSY
44
|
|
|
> |
|