reasonable price for the schematic - the service is perfect, all as expected and pointed by instructions - good scan of the original plans - thank you!
Manual was just as described!!! I odered it and in less than a day was able to download it and the text was clear and pages were all complete just as the original manual was. Purcashed this for a friend and they were more than happy. Perfect all around!
The manual I purchased was exactly what I needed to repair my Toshica television. The manual contained schematics and troubleshooting information that was very helpful.
Il download del Service Manual JVC HR 4100 non é stato eseguito
Text excerpt from page 169 (click to view)
5
6
7
8
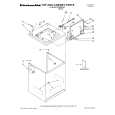
- Removing the Case (Fig.5)
A
1 2 3
Remove the two screws and then remove the Holder. Remove the screw.
3 1 3 2 3 1 3
3
Remove the five screws and then remove the Case.
B
Case
Holder
Fig.5
- Removing the Display Assy (Fig.6)
Motor Unit
1
Remove the screw.
Disconnect the connector and then remove the Motor Unit.
Switch
C
1
2 3
Remove the two screws and then remove the two Holders. Pull out the Display Assy in the arrow indicated direction.
Note) When reassembling, hold the switch down with tweezers or the like and put the Display Assy back to the Chassis. Otherwise, the switch may be damaged and not function properly.
D
2
2
Holder
3
Holder Display Assy
Fig.6
- Removing the Main Unit (Fig.7)
Bracket
2 3 1 3 3
Shaft Unit
2
E
1 2 3
Remove the screw and then remove the Bracket. Remove the four screws and then remove the Shaft Unit. Remove the three screws.
2
2
Disconnect the connector and then remove the Main Unit.