It's great to be able to obtain a precious technical information for a real old equipment. The one I got helps me a lot in the area of wiring diagram to repair my antique. PDF gave me clear enough information to find out thr details. Thanks for giving me the oppotunity to be able to access to almost vanished informations.
Another excellent aquisition. Fine detailed manual. Thanks
Text excerpt from page 155 (click to view)
5
6
7
8
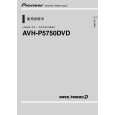
- Removing the Display Assy (Fig.7)
Display Assy
Holder
A
1 2 3
Remove the two screws and then remove the Holder. Remove the three screws and then remove the Cover Unit. Remove the four screws.
1
1
4
4
Disconnect the connector and then remove the Display Assy.
4 2 2 2
4
B
Cover Unit
Fig.7 - Removing the Monitor PCB (Fig.8)
1
Straighten the tabs at two locations indicated.
1
1
C
2
Remove the three screws.
Disconnect the connector and then remove the Monitor PCB.
2 2
2
D
Monitor PCB
Fig.8
Note: Tighten the screws with the panel in warped state as shown in the photograph below. Otherwise, it will be difficult to install Detach Grille Assy to Panel Assy.
E