Thank you for your shop manual! Your help was very useful - the device is repaired! Once again - Thank you! I wish you a successful business! Edward (Russia).
It was a great experience,instead of purchasing a new Stereo Amplifier ,in just minutes i repaired my old one and that was thaks to the manual I have purchased from you.
Thanks again.
Samuel Alter
Das ging ja sehr unkompliziert hat bestens geklappt und die Quallität ist auch noch gut.
Vielen Dank dafür.
Text excerpt from page 163 (click to view)
5
6
7
8
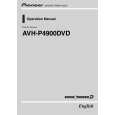
- Removing the Display Assy (Fig.7)
Display Assy
Holder
A
1 2 3
Remove the two screws and then remove the Holder. Remove the three screws and then remove the Cover Unit. Remove the four screws.
1
1
4
4
Disconnect the connector and then remove the Display Assy.
4 2 2 2
4
B
Cover Unit
Fig.7 - Removing the Monitor PCB (Fig.8)
1
Straighten the tabs at two locations indicated.
1
1
C
2
Remove the three screws.
Disconnect the connector and then remove the Monitor PCB.
2 2
2
D
Monitor PCB
Fig.8
Note: Tighten the screws with the panel in warped state as shown in the photograph below. Otherwise, it will be difficult to install Detach Grille Assy to Panel Assy.
E